Déclenchez un e-mail avec Zoho Survey
Déclenchez un e-mail avec Zoho Survey
Triggers are actions or workflows that you can create from within Zoho Survey. Zoho Survey currently supports three triggers, Trigger Emails, Trigger Functions, and Webhook. You can set up automated email notifications for every survey response or only when a respondent answers your survey in a certain way. You can also send the user's score, total score, and the percentage of the total score for each question and page in an email notification by using the scoring feature.
To create an email trigger:
- Click the Hub tab.
- Click the Triggers section.
- Click Create in the Trigger Emails section.

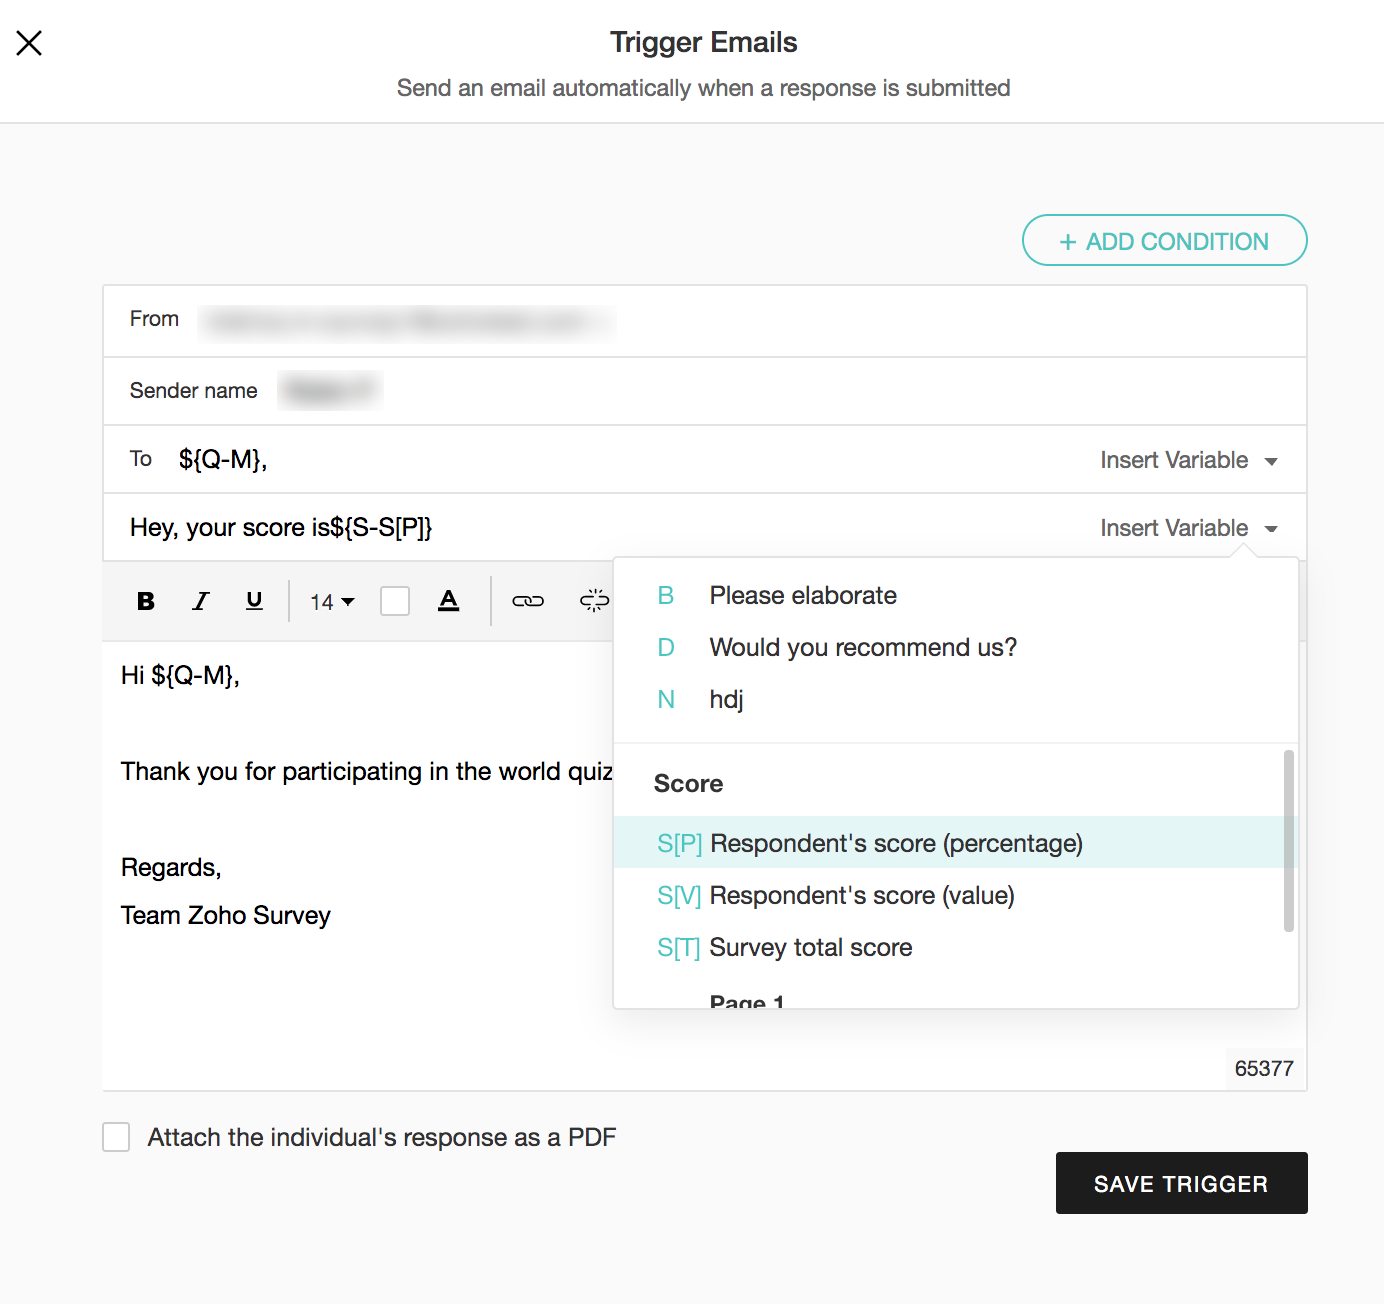
- Your default email address will be displayed in the From box. Click the dropdown to select another user from your currently selected department. To add another email in the From box, click the down arrow next to the From email address and click Add Email. You'll be taken to the accounts page, where you can add more email addresses.
- Reload the page to update your list of email addresses.
- Type the name of the sender in the Sender name field.
- In the To box, type the email addresses where you want to send trigger emails. Separate the addresses with commas. If you have an email question in your survey, you don't have to type in email addresses manually—insert them as variables in the To box.
- In the Cc box, type the email addresses where you want to send the trigger emails in Cc if required. Separate the addresses with commas. If you have an email question in your survey, you don't have to type in the email addresses manually-insert manually—insert them as variables in the Cc box.
- Add a subject for the trigger email in the Subject box. You can also select a variable from the Insert Variable dropdown and make it the subject. For example, you can insert a variable called Name and say "<name of the respondent>, you've got feedback!"
- Click Respondent's score (percentage) to send the percentage of the total score.
- Click Respondent's score (value) to send only the user's score.
- Click Survey total score to send the total score.
- Click Page> Respondent's score (percentage) to send the percentage of the total score for a particular page.
- Click Page> Respondent's score (value) to send the user's score for a particular page.
- Click Page total score to send the total score for a particular page.
- Click Plain text to write an email without any formatting. You can switch back to the default mode by clicking Rich text.
- Fill in the body of the email. You can insert a variable here as well. In the Insert Variable dropdown, if you select All Responses, the trigger email will contain all the responses that the respondent has submitted. You can also send the details of the score for each question and page by using the insert variable feature.
- Select Attach the individual's response as PDF if you want to send the individual responses along with the email.
- Click Save Trigger.
To personalize the content of your triggered email:
- Click the Hub tab.
- Click the Triggers section.
- Click Create in the Trigger Emails section.
- After filling in the From, Sender name, To, and Subject fields, you can write the body for the trigger email. You can also select a variable from the Insert Variable dropdown and personalize the content. For example, you can insert a variable called Name and say, "Hello <name of the respondent>!".
- Click Plain text to write an email without any formatting. You can switch back to the default mode by clicking Rich text.
- Select Attach the individual's response as PDF if you want to send the individual responses along with the email.
- Click Save Trigger.
To set up an automated email to respondents who have given specific answers:
- Click the Hub tab and select Triggers.
- Click Create in the Trigger Emails section.
- Click Add Condition to set a condition to send an email based on the answer to a particular question.
- Click + to add multiple conditions.Note:
Multiple conditions work in a pattern similar to this: (((((C1 and/or C2) and/or C3) and/or C4) and/or C5) and/or ...) where C1, C2, C3, ... are conditions. - Select a question from the If dropdown list.
- Set a condition for the selected question.

- In the Operand box, type in the answer for the condition you've set. When the user submits their response, and if the question meets the conditions you've set, an email will be sent to the respondent. You can apply multiple logic options in an email trigger.
- Click X to remove conditions.
- Click And/Or to connect multiple conditions.
To edit the condition pattern:
- After adding logic conditions, click Edit in the Condition Pattern section. The Condition Pattern section will appear only if you add more than two conditions.
- Edit the condition IDs (C1, C2, C3...) and And/Or, as required.
- Click Apply. Any changes made in the Condition Pattern section get reflected in the Condition section, and vice versa.
To edit an existing email trigger:
- Click the Hub tab.
- Click Manage in the Triggers section.
- Hover over the trigger you want to edit and click
 .
. - Make the necessary changes and click Save Trigger.
To delete an email trigger:
- Click the Hub tab.
- Click Manage in the Triggers section.
- Hover over the trigger you want to delete and click
 .
.
To personalize the subject of your triggered email:
- Click the Hub tab.
- Click the Triggers section.
- Click Create in the Trigger Emails section.
- After filling in the From, Sender name, and To fields, you can add a subject for the trigger email in the Subject box. You can also select a variable from the Insert Variable dropdown and make it the subject. For example, you can insert a variable called Name and say "<name of the respondent>, you've got feedback!"
- Click Respondent's score (percentage) to send the percentage of the total score.
- Click Respondent's score (value) to send only the user's score.
- Click Survey total score to send the total score.
- Click Page> Respondent's score (percentage) to send the percentage of the total score for a particular page.
- Click Page> Respondent's score (value) to send the user's score for a particular page.
- Click Page total score to send the total score for a particular page.
- Click Plain text to write an email without any formatting. You can switch back to the default mode by clicking Rich text.
- Click Save Trigger.
To change the 'From' email address:
- Click the Hub tab.
- Click the Triggers section.
- Click Create in the Trigger Emails section.
- Your default email address will be displayed in the From box. Click the dropdown to select another user from your currently selected department. To add another email in the From box, click the down arrow next to the From email address and click Add Email. You'll be taken to the accounts page, where you can add more email addresses.
- Reload the page to update your list of email addresses.
To add sender email address:
In your survey application, click on the Profile.
Click Manage Portal.
Select Sender Email Authentication on the left pane.
Click Add.
Enter the required email addresses in the Email Address textbox.
Click Save to receive verification emails in the email address you have provided.
To verify your email addresses, log in to your email client and open the verification email sent by Zoho Survey.
Click the Accept button in the email to complete the verification process.
Once verified, you will find your sender address listed under the Sender Email Authentication tab and the domain listed under the Domain Authentication tab.

Note
- Verified emails will be listed under Trigger Emails.
- Verified and domain-authenticated emails will be listed under Email Distribution.
To set up an automated email:
- Click the Hub tab.
- Click the Triggers section.
- Click Create in the Trigger Emails section.
- After filling in the From, Sender name, To, and Subject of the email, you can fill in the body of the email. You can insert a variable here as well. In the Insert Variable dropdown, if you select All Responses, the trigger email will contain all the responses that the respondent has submitted. You can also send the details of the score for each question and page by using the insert variable feature.
- Click Save Trigger.
Related Articles
Créer un alias de messagerie/Modifier l'adresse e-mail
Créer un alias de messagerie/Modifier l'adresse e-mailChanger le Nom d'affichage du courriel dans Zoho mail
Pour Changer le Nom d'affichage du courriel dans Zoho mail Aller dans les Settings (l'engrenage en haut à droite) Vous verrez une vue avec pleins de rectangles d'options comme ceci : Vous devrez cliquer en haut sur les onglets pour voir moins ...Signature dans Zoho Mail
Signature dans Zoho MailZoho Mail AIDE
HELP https://www.zoho.com/mail/help/Zoho Annotator
Aujourd'hui, Jf nous parle de Zoho Annotator! Zoho Annotator est un outil d'annotation en ligne qui permet aux utilisateurs de marquer des commentaires sur des documents numériques de divers formats, tels que des PDF, des images et des vidéos. Il est ...